
Cleaning the Service Station
Caution: Please be sure that you are using proper cleaning techniques to clean items that come in contact with the printhead. Use only distilled or deionized water and lint free cloths. If you don’t follow this rule, you will introduce contamination into the printhead; which can damage the printhead and ink system.

Wiper Roller Removal and Cleaning or Replacement
Tip: Although the wiper roller can be cleaned; this process is time-consuming. When you factor in labor costs; you may find it more cost-effective to replace the wiper roller instead. We also recommend that the wiper roller be replaced whenever a new printhead is installed.
Removal:
| 1. Lift up, about one inch, on the Wiper Motor Assembly; to expose the latch retaining screws [C] (one at each end). NOTE: Early versions of this assembly did not have retaining screws. |
|
| 2. Carefully loosen the two small screws retaining the wiper roller latches. Tip: To avoid losing these screws; don’t remove the screws. You only need to back-out the screws far enough so the latches can be opened. | |
| 3. Release the two latches that secure the wiper roller. | |
| 4. Remove the Wiper Roller from the Wiper Motor Assembly. |

Cleaning/Replacement:
|
1. Using distilled water; immerse for 10 minutes, then remove and pat dry with absorbent lint free towel. WARNING! Do NOT rub the roller, when cleaning or drying it. This will cause damage to the roller fabric. Do NOT use tap/mineral/spring water to clean the wiper roller; doing so will introduce contaminants into the roller. A contaminated roller will cause damage to the printhead and ink system. Allow the roller to dry completely, before re-installing it. |
| 2. If the Wiper Roller shows signs of wear (fabric surface torn, uneven or fuzzy), it should be replaced. Be sure to remove the plastic cover from the new Wiper Roller before installing it. |
Install:
|
1. Re-install the Wiper Roller into the Wiper Motor Assembly. Make sure the gear on the Wiper Roller engages the gear in the Wiper Motor Assembly. TIP: If you are planning to clean the Wiper Motor Assembly; don’t re-install the wiper roller until you have completed the Wiper Motor Assembly cleaning process. |
| 2. Carefully close the latches. Make sure the latches are fully locked and then tighten the latch retaining screws [C] (don’t over-tighten). |
Wiper Motor Assembly Removal and Cleaning
Removal:
| 1. Disconnect (unplug) the wiper motor cable from the Service Station Printed Circuit Board [A]. | |
| 2. Remove the Printed Circuit Board [A] from the Service Station Tray. Carefully release clips to remove board. | |
| 3. Lift the Wiper Motor Assembly [B] from the Tray. The motor wires can be pulled through the hole in the side of the tray. | |
| 4. Remove the Wiper Roller from the Wiper Motor Assembly. See procedure on previous page. | |


Cleaning:
| 1. Pour distilled water into a flat-bottom container to the depth of about 17mm. | |
| 2. Carefully immerse the Wiper Motor Assembly, motor side up, into the water. | |
| 3. If vents are showing, carefully add more water until they are covered. Allow the Wiper Motor Assembly to soak for 10 minutes. | |
|
4. Carefully remove the Wiper Motor Assembly from the water. Inspect the vents and remove any debris with tweezers. Pat dry with an absorbent lint-free towel. NOTE: If this assembly shows signs of wear or damage it should be replaced. If the Service Station is more than one year old, depending on monthly volume, it may be worthwhile to replace the entire Service Station instead of replacing components. | |

Install:
| 1. Allow the Wiper Motor Assembly to dry. | |
| 2. Lightly lubricate the three Wiper Motor Gears [D] with synthetic PTFE grease (Super Lube 21030 or equivalent). | |
|
3. Re-install in reverse order. NOTE: Make sure the wiper roller is re-installed, wiper roller latches are fully closed/locked and the wiper roller retaining screws are fully tightened (do not over-tighten). TIP: If you are planning to clean the Service Station Tray; don’t re-install this component until you have completed the Service Station Tray cleaning process. | |

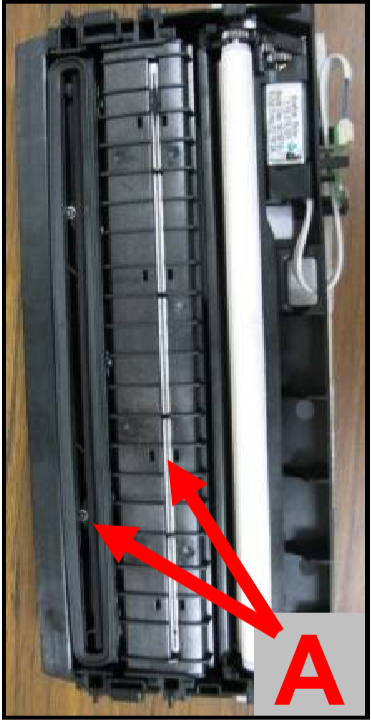
Printing Platen and Capping Station Removal and Cleaning
Removal:
| 1. Both of these items [A] simply lift out, for removal from the Service Station. |
Cleaning:
|
1. Rinse off ink using tap water. Tip: Make sure the valve, located on the bottom of the Capping Station, is clear of debris and working. |
| 2. Pat dry with an absorbent lint-free cloth. |
|
3. After cleaning the Capping Station; wipe the capping lip with a lint free cloth, dampened with distilled water. This will help insure that the contaminants on the cap are removed, before the cap makes contact with the printhead. NOTE: If either of these items show signs of wear or damage they should be replaced. If the Service Station is more than one year old, depending on monthly volume, it may be worthwhile to replace the entire Service Station instead of replacing components. |
Install:
| 1. Allow the Printing Platen and Capping Station to dry. |
| 2. Reinstall Printing Platen and Capping Station into Service Station Tray. TIP: If you are planning to clean the Service Station Tray; don’t re-install this component until you have completed the Service Station Tray cleaning process. |
Cleaning the Service Station Tray
| 1. If present; remove the Service Station Printed Circuit Board, Wiper Motor Assembly, Printing Platen and Capping Station from the Tray; as described on the previous sections/pages. |
| 2. Wipe the Tray with a damp, lint-free cloth to remove the major ink buildup. Be careful not to damage/peel-off the wicking material; from the surface of the Tray. |
| 3. Then rinse the Tray using tap water. |
| 4. Allow the tray to dry. NOTE: If the Tray shows signs of wear or damage (wicking material torn or coming loose from surface of tray) the Tray should be replaced. If the Service Station is more than one year old, depending on monthly volume, it may be worthwhile to replace the entire Service Station instead of replacing components. |
| 5. Reinstall the Service Station Printed Circuit Board, Wiper Motor Assembly, Printing Platen and Capping Station, into the Tray. |
Suggestion for High Volume Users:
For printers that are being used at high volumes (over 200,000 pieces per month), we recommend purchasing a second service station to reduce down-time for Service Station Maintenance. The new/clean service station can be swapped with the dirty one. Then the dirty Service Station can be cleaned, as described on the previous pages, and made ready for the next time Service Station Maintenance is required.