Services Menus View
|
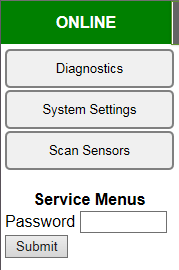
SERVICE MENUS View Select “View”, then “Service Menus” to open. Diagnostics button. Click to check the status of the Printer. (See Diagnostics below.) System Settings button. Click to view, enter or change settings to connect Printer to your network. You can also set and configure Printer Date and Time. (See section titled System Settings for details.) Scan Sensors button. Provides status and a log on Sensors located throughout the Printer. (See section titled Scan Sensors for details.) Service Menus, Password: Entering the Service Menu password provides access to more advanced Printer control and maintenance menus. (See section titled Service Menus, Password for details.) |
|
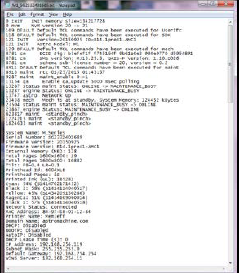
DIAGNOSTICS From this screen, you can see the status of your Printer. You can also: Upload Debug Log – Download and save a log of the Printer status (for each Printer) to send to a technician to help diagnose a problem. Clicking this button creates a snapshot log showing everything going on with the Printer since powering up. (See Sample Log below.) NOTE: If a problem arises, try to recreate the problem, then press Upload Debug Log without performing any other actions to make it easier for the technician to determine the problem. If this is not possible, include any actions you may have taken after the problem started. Other information provided in the Diagnostics window: Event Log – Displays significant events occurring on the Printer (such as firmware updates, errors, power off, etc.) Useful for troubleshooting Printer problems. NVM Settings – Displays Printer's current NVM (Non-Volatile Memory) settings. (Once settings are saved, they remain even when Printer is turned off, until they are manually changed.) VARS Settings – Displays Printer's current VARs (Variable) settings. (Settings that are set for a particular job that automatically revert to the default settings when the Printer is turned off or rebooted.) |
|

|
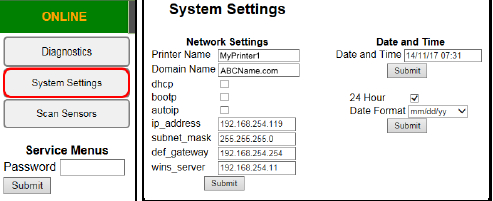
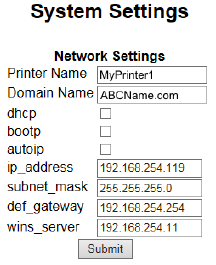
SYSTEM SETTINGS Set up a network connection for the Printer. Set and configure Printer Date and Time. Note: To access and change these printer parameters; you must initially install the printer Driver via USB and connect to the printer via USB. See “Install the Printer Software (Driver & Toolbox)” and “Connecting the Printer via Network (Ethernet Port)”, for detailed instructions. Tips: The information shown on this page is just an example. You must use settings that are compatible with your network and settings that are not in direct conflict with other devices on the network. Check with your IT support person for help with the following settings. Be sure to click on “Submit” after entering new information. We strongly suggest using a “Static” IP address. Network Settings Permits you (or your IT person) to view, enter or change settings to connect the Printer to your network: Printer Name – Displays the “default” printer name. A new name can be entered, if desired/required. Domain Name – Enter the name of the Network Domain, if required. dhcp – Uncheck if using a “Static” (manually entered) IP address. Select if using dhcp. Dynamic Host Configuration Protocol (DHCP) is a network protocol that enables a server to automatically assign an IP address to a device from a defined range of numbers configured for a given network. bootp – Uncheck if using a “Static” (manually entered) IP address. Select if using bootp. The Bootstrap Protocol (BOOTP) is a computer networking protocol used in Internet Protocol networks to automatically assign an IP address to network devices from a configuration server. autoip – Uncheck if using a “Static (manually entered) IP address. Select if using autoip. “Autoip” is a module that enables the automatic assignment of an IP address to a device on startup. ip_address – Enter the “Static” Internet Protocol (IP) Address that you would like this printer to use. Note: If “dhcp, bootp, or autoip” are selected, and the network is configured to use any of these features, the IP Address will automatically appear here (address automatically assigned/re-assigned by network). Tip: We strongly suggest using a “Static” IP address. If the network reassigns a new IP Address, after you have configured the printer driver to use a previous IP Address, you will lose communication with the printer until you manually change the IP Address in the driver to match the printer’s new IP Address. subnet_mask – Enter the subnet mask address, if required. def_gateway – Enter the default gateway address, if required. wins server – Enter the wins server address, if required. |
|