
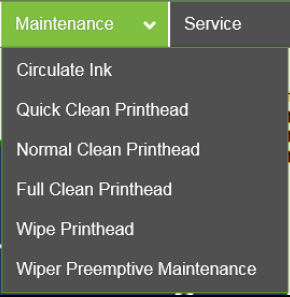
Maintenance Drop-Down Menu
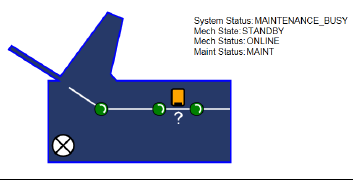
MAINTENANCE Drop-Down MenuThe printer automatically performs maintenance tasks to keep the printhead and ink system performing properly. The following buttons can be used, as needed, to provide supplemental maintenance. CAUTION: Over-use of these features can negatively affect print quality and printer performance. Note: The Memjet printhead contains 70,400 nozzles. Each nozzle is a fraction of the diameter of a human hair. Under normal use, it is common for a small percentage of nozzles to become clogged/dehydrated. Circulate Ink – May be used to help purge air from the lines and prime the ink system. Quick Clean Printhead – Circulates ink, purges nozzles, wipes and cleans surface of the printhead nozzles. Normal Clean Printhead – Provides a higher level of nozzle cleaning than “Quick Clean” does. Full Clean Printhead – Provides a higher level of nozzle cleaning than “Normal Clean” does. Wipe Printhead – Wipes excess ink from the surface of the printhead nozzles. No ink is ejected in this process. Tip: This feature can be used by an experience/trained user or technician, to inspect the wiper roller. Please be sure to keep hands and loose clothing clear of all moving parts. Please be sure to properly open/close clamshell. Wiper Preemptive Maintenance – The “wiper preemptive maintenance” feature was added to help improve printhead nozzle cleaning and prevent damage to the wiper module; due to ink coagulation caused by extended periods of inactivity or non-use. When this button is pressed, the printer saturates the Wiper Roller, with ink, to help break-up and remove coagulated ink residue from the wiper roller and wiper module. TIP for customers that don’t print frequently: If the printer is not being used “on a regular basis” (printer sits off or idle for more than three days at a time); it is recommended that you contact your service support representative and ask them to set the “wiper_maint_cycle” feature, located within Toolbox Service Menus, “Printer Control Config” to 72 hours. This will provide automatic “wiper preventive maintenance” every 72 hours. Default = zero (off). What occurs during the Wiper Preemptive Maintenance process? The wiper roller is positioned underneath the printhead nozzles. The printhead ejects a regulated amount of ink, while the wiper roller is spinning slowly beneath the printhead nozzles. Coagulated ink is re-hydrated by the new ink; allowing the ink to be removed (squeezed-out) as the wiper roller rotates against the squeegee roller. It has been estimated that the amount of ink used in this process is similar to the amount of ink used during the “Full Clean Printhead”process. NOTE: When “wiper preemptive maintenance” is being performed, the Toolbox System Status will be displayed as “MAINT” and “MAINTENANCE_BUSY”. You will also see various icons appear in the Service Station position on the Printer icon as the Printer performs the procedure. Maintenance Tips: If these cleaning features have no effect, or they increase print quality issues, this may be an indication that the printhead and or “wiper roller” may need to be replaced or the “Service Station” may need to be serviced. Since a dirty/worn/damaged “wiper roller” can cause damage to a new printhead, it is recommended that the “wiper roller” be replaced whenever the printhead is replaced. Please contact your service preventative to have them perform this procedure. Do NOT use the above features to try to reduce “scuff marks” (black lines/streaks that are deposited on the media surface) and image smudging/smearing. Using these features will normally aggravate these issues. “Scuff marks” occur when the media makes contact with the printhead. Smudging/smearing occurs when the wet image makes contact with the printhead or other areas. The most common head to media contact areas are the high points (bows, bends, flaps) on the media and the trailing edge of the media. Things that may help reduce scuff-marks and image smudging/smearing: - Check to be sure the “Head Media Guide” and or “PPS Spacers” are installed. See section titled “Envelope Printing Attachment Kit” for more details. - Check to be sure the Head Media Guide, Printhead, lip of Cap (capping station) and other surfaces are clean. Clean using distilled water and a lint free cloth. - Try feeding the media in a different orientation. Rotate piece 90, 180, 270 degrees. - Try to use media that is flat (not warped, bowed or bent). Be sure flaps are folded crisply. |
|
|
SERVICE Drop-Down Menu WARNING! These buttons should only be used by an experienced/trained user. Improper usage can cause damage to the system. These buttons control functions that require the machine to be “out of service”, for an extended time, while procedures are being performed. To help reduce the chance of an accidental button press; an acknowledgement step was also added to the function of these buttons. If one of functions is selected, you will be prompted with a message asking if you “are sure you want to continue”. Replace Ink Tanks – Disconnects Printer communication with Ink Tanks; allowing for the safe removal or install of Ink Tanks. Press the “Replace Ink Tanks” button before removing/installing Ink Tanks. Press the “Continue” button only after verifying that the Ink Tanks have been properly installed and the Ink Tank Latches are secure. WARNING: If the above procedure is not followed, damage to the Ink Tanks may result, rendering them useless. Refresh Ink Levels – Used to update or confirm the ink levels shown at the left side of the screen. Eject Service Station – Drives the Service Station out until it is released from the drive gears, so it can be removed for cleaning, repair or replacement. Please refer to the “Maintenance” section for additional details. Install Service Station – Pulls the Service Station back into place after cleaning, repair or replacement. System Deprime – Used to pump most of the ink back into the Ink Tanks; prior to servicing or transporting the Printer. Release Printhead – Use to remove/install the Printhead Cartridge. Pressing this button will cause the printer to partially deprime the system (evacuate ink from the printhead) and release the Printhead Latch. Shutdown – Powers-down the print-engine. Same as pressing the ON/OFF button on the printer’s control panel. To help improve print quality and printhead life, it is recommended to keep the printer powered-up at all times so the printer can perform routine maintenance. If you need to turn the printer off, please be sure to power-down the print-engine, using the “Shutdown” button in the Toolbox or the ON/OFF button on the control panel. Wait until all the control panel buttons go out, before turning off the Main Power Switch. Restart – This button can be used to Restart (reboot) the printer more quickly than when using the power-down or shutdown processes. Pressing the Restart button bypasses the shutdown maintenance routines; thereby reducing the overall reboot time. |
