|
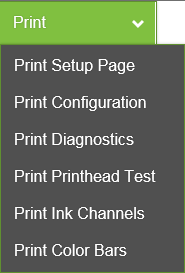
PRINT Drop-Down Menu Print various reports and Printer tests. Each printout displays information about the Printer. Print Setup Page – Prints a test pattern used to align front and back sides of a page printed using a “Duplex Unit”. NOTE: Do not use to align border-lines with page edges. Print Configuration Page – Prints out the current printer configuration including Firmware Version and supplies status/serial numbers. Print Diagnostics Page – Prints out printer information such as Device serial number, Firmware version, Internal memory, page counts, Network Settings and Event Log. Print Printhead Test – Prints small color bands, text and patterns. Used to check the condition of the printhead nozzles. Smaller text and patterns help to show any inaccuracies in dot placement. Print Ink Channels – Prints five solid blocks/bars of color (1 block/bar from each Ink Tank CMYKK) to show how well the nozzles are performing, in each color channel of the Printhead. Tip: This function can also be accessed by pressing the “Print Ink Channels” button; located on the top, non-operator side, of the Print Engine. Print Color Bars Page – Prints a series of seven color bars to show how well the Printhead is mixing colors and printing. NOTE: Load 8.5 x 11, or longer, media before performing the above printouts. Wait for the job or test print to finish before pressing any additional buttons. Printing Once the printer installation and setup is complete, you are ready to start printing. Please see the section titled “Software Setup Information” for details on how to setup the computer software to print to the printer. If a printhead was recently installed or the printer was left powered OFF for more than a few hours; it is recommend that you perform a “Printhead Cartridge Conditioning” routine, outlined on the next page, before you print a live job. |
|
Printhead Cartridge Conditioning When a printhead cartridge is installed, it is common for some residual ink accumulation to occur in certain areas within the print engine. There may also be some color contamination between ink channels and air bubbles trapped in the printhead. These contaminants should be manually cleaned from the components and purged from the printhead. Air bubbles in the printhead will present themselves as unevenly shaped bands of missing color. Color contamination will present itself as mottled, muddy or distorted colors. See “Print Quality Issues” for more details. After installing a new printhead cartridge, or reinstall a used printhead cartridge, please use the following routine to condition the printhead cartridge and ink system. Note: The following process assumes you are using a printer with firmware R15.0 or higher installed. Removing Residual Ink: 1. Power-down the printer using the ON/OFF button. Wait for all Control Panel lights to go out before proceeding. 2. Carefully open the Clamshell and inspect/clean any visible ink from the following areas. Printhead surface (See “Manual Printhead Cleaning”). Head Media Guide (See “Envelope Printing Attachment Kit”). You may need to remove to clean behind Guide. Rubber Lip of capping station (See “Inspecting & Cleaning the Lip of the Capping Station”). 3. Once you are finished cleaning, carefully close and latch the Clamshell. Printhead Cartridge Conditioning: 1. Power-up the printer. 2. Setup and load the printer with at least ten sheets of 8.5 x 11 inkjet suitable paper. 3. Open the “Toolbox” utility. 4. Select the “Maintenance” drop-down menu (located at top of Toolbox screen). Click on “Circulate Ink”. While the ink is circulating, tap lightly on the ink tubes, located at the operator side of the printer, and on the printhead cartridge. This will help dislodge air bubbles; allowing them to pass through the printhead and out the non-operator side of the printhead. NOTE: It is normal to see a small amount of air bubble accumulation in the ink tubes located at the non-operator side of the printer. This is OK. IMPORTANT! To avoid abnormal pressure buildup in the ink system; do NOT select the “Circulate Ink” more than once every 15 minutes (not to exceed more than three times in one hour). 5. Click on the “Print” drop-down menu (located at top of Toolbox screen). 6. Select “Print Ink Channels” from the drop-down menu. A page representing each individual ink channel (CMYKK) will be printed. 7. Once the “Print Ink Channels” page has finished printing; check the results. If the output is not acceptable; repeat this process until you are satisfied with the output. You should notice that each time you print another page, the image quality and color will improve. It may take up to ten pages before the output is satisfactory. NOTE: Make sure you allow the printer to completely print each page before you press the “Print Ink Channels” button again. 8. Now you are ready to print your job. |