Printer Driver Properties
Valid for M Series Driver version R15
NOTE: The R15 Driver was developed for use with printer firmware version R15 20180130. They should be used as a set. If you try to use this Driver with other printer firmware versions, some of the Driver properties/features may not work.
New User Tip: When you are first learning how these Driver features effect the image orientation and position; it may make more sense to load 8.5 x 11 media into the printer and print a single page after each change you make to the Driver settings. If you follow this process, you will be able to see more of the image (which may print off the side of a smaller media) as well as the orientation and position of the image. Once the proper image orientation/position is achieved; load your desired media to match the orientation of the image. The Printer Driver for the M Series Printer works similar to other Printer Drivers for Windows®. It does contain some features that are unique to this printer. The Driver properties/features are explained below. Once the job is set-up in your Windows® program (Adobe Acrobat, MS-Word, etc.); select Print. The window on the right will open. Make sure the M Series Driver is the selected Printer. Clicking on Properties opens the “M Series Driver Properties” window; shown below.
General Tab
The General tab lets you select:
|
Orientation – Portrait (Default), Landscape, Rotate 180° and Mirrored. Tip: Instead of changing this setting from “portrait” to “landscape”; experiment with the drop-down list of Media “Size” selections (i.e. “6 x 9 in – Portrait” or “6 x 9 in – Landscape”) to match the printed image orientation to the actual orientation of how the media is being fed into the printer. |

|
Page Buffering – If Buffer is checked; the entire print job will be spooled before it is sent to the printer. This will increase the time it takes for the job to start printing, but it may also reduce the chance of the printer pausing to wait for data and or displaying “DATA_PATH_UNDERRUN” in the Toolbox.
-
Mask Optimization (checked is default) - Optimizes images for printing in most applications. For some printing applications; printing artifacts (faint lines) may still appear in the output, when “Mask Optimization” is selected. If this happens; deselect (uncheck) "Mask Optimization" which usually corrects the issue. (Remember to check/uncheck box when changing applications.)
-
Back Page – Unavailable unless Printer is attached to “Duplex Unit”. Used to load a static (unchanging) “back page”, which will be stored and reprinted onto every piece that is fed into the Duplex Unit.
-
PC Capture – When checked, saves a Print File (*.prn) on the PC (C:\Windows\Temp) at the same time the data is being sent to the printer. (Unchecked is default.) The box, below the PC Capture selection, is provided to name the file; otherwise, the Driver assigns the current date and a numerical name. Example: 20190515_163246.prn. You may be asked to provide a Print File when working with a technician or support agent.
|
Copies– Lets you choose the number of copies to be printed. NOTE: This Driver version has a limit of 32,767 copies. However, in some cases, copies are limited by the software program. For example; Adobe Acrobat® limits copies to 999.
-
Reverse Order – Lets you choose the order of how the pages will be printed. If un-checked (default); the job will start printing with the first page. Printing starts as soon as the first page loads. If checked, job will start printing from the last page. Since the entire job must be spooled, before being sent to the printer, it may take a while for the job to start printing.
-
Collate – only available when “copies” is set to 2 or more. If un-checked (default); each page will be printed with the selected number of copies before the next page is printed. If checked; copies will be grouped into sets (in page order).
|
Media– Select Type and Size. Add Custom Size.
-
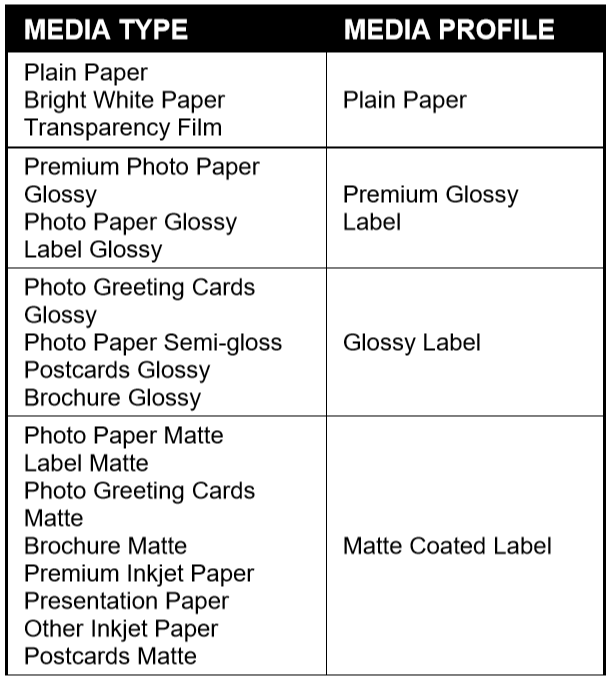
Type:Selecting the appropriate Media Type (media profile) may help you achieve better color accuracy results. Chart at right lists the “media types” associated with each of the “media profiles”.
-
TIP: mColor (RIP and Workflow) software is available; if you require better “color management” options. Please contact your dealer for more information on “mColor”.
-
Size:Select the media size you are using, from the pull-down list. If the size is not present use the “Custom Sizes” feature.
-
Tip: Some common Envelope (Env.) selections are provided for “portrait” and “landscape” orientations. Experiment with these selections to match the printed image orientation to the orientation of how the media is being fed into the printer.
-
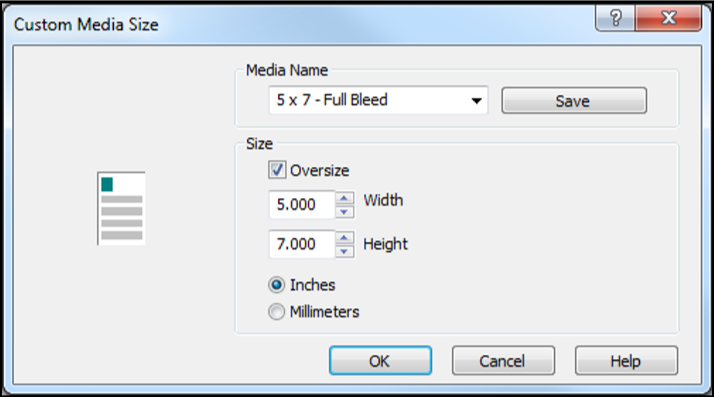
Custom Sizes:Use to create and save “custom media sizes”.
- Range: Width: 3” (76mm) min to 8.5” (215.9mm) max.; Height: 4.2” (106.7mm) min to 30” (762mm) max.
-
NOTE: The security rights on some computer systems may prevent you from accessing or saving “Custom Sizes”. You may need “admin” rights to use this feature.
- After defining a “custom media size”; enter your desired “Media Name” and press “Save”.
Tip: When defining the width of a “custom media size” that measures between 8.5 and 9.5 inches wide; please set the width value to 8.5” (max print width of printer). Example: #10 Env (9.5”W x 4.13”H), feeding long-edge first. Set dimensions to 8.5”W x 4.2”H. Media Orientation Tip: When defining a “custom media size”; be sure to set the dimensions to match the actual orientation of the media; as it is fed through the printer. Example: 5” x 7” envelope, fed long-edge fist, would have the custom dimensions 7” W x 5” H -
Oversize – Select this box to enable “full bleed” printing (printing off all edges of media). When “oversize” is selected the “custom media size” you define is increased by ~0.12” in width and height; without affecting the values shown in the “Custom Media Size” screen.
IMPORTANT! In order to take advantage of this feature; the image you send must be slightly larger (normally 1/8” wider and higher) than the “custom media size” you defined. Full Bleed Example: “Custom media size” defined as 5” W x 7” H and “oversize” selected. Media being fed measures 5” W x 7” H. Image being sent measures 5.125 W x 7.125 H. Full Bleed Tips: To avoid image expansion/distortion, please be sure to set/check the following: - Layout Tab. “Resizing” should be set to “Original Size”. - Adobe Acrobat. Select “Actual size” under “Page Sizing and Handling” in the Print box. You may also need to make changes to the “left adjustment” and “top adjustment” features, located in the “Layout Tab”; to align the image with the media, so it bleeds equally off all edges of the media.
Borderless Print – When using an image that is the exact same size as the media, this option can be selected to expand the image (21 dots in height and width); to help achieve “full-bleed” printing (printing off all edges of the media). NOTE: If you want to do “full-bleed” printing but don’t want the image expanded/distorted; please use the “Oversize” feature; as defined under “Custom Sizes”.
|
|
|
Duplex Settings – Unavailable unless Printer is attached to a “Duplex Unit”. |
Color Selection– Select from Color, Composite Black or Black Only.
-
Color: Selection provides full color printing using all five ink channels (CMYKK).
-
Composite Black: Selection uses all five ink channels (CMYKK), to generate the darkest black print possible; for the selected print quality. Color images are printed in “grayscale”.
-
Black Only: Selection uses only the native “K” (black) ink channels to print. Images printed with this selection will be “gray” in color. This is the “native” “K” (black) ink color. If you want a darker black, please select “Composite Black”. Color images are printed in “grayscale” using only the “K” (black) ink channels.
-
NOTE: Even if you select “Black Only” the system will still use a small amount of color ink (CMY) when performing head purge and head maintenance sequences. All Ink Tanks (CMYKK) must be installed and recognized as having ink available, or the printer will NOT function.
|
Print Quality– Select Normal or Best.
-
Normal provides 1600 x 800 dpi at 12 ips (inches per second). If you also select the Half Speed, box; media transport and printing is slowed to 6 ips, for higher print accuracy.
-
Best provides 1600 x 1600 dpi, at 6 ips. Use when high quality images are required.
-
NOTE: The “Half Speed” selection is not available in the “Best” print quality mode.
|
|
My Print Settings – Allows you to save or recall your custom Driver settings for various jobs. When you save or replace a “My Printer Settings” selection, all settings within the General, Layout and Color tabs are saved. |
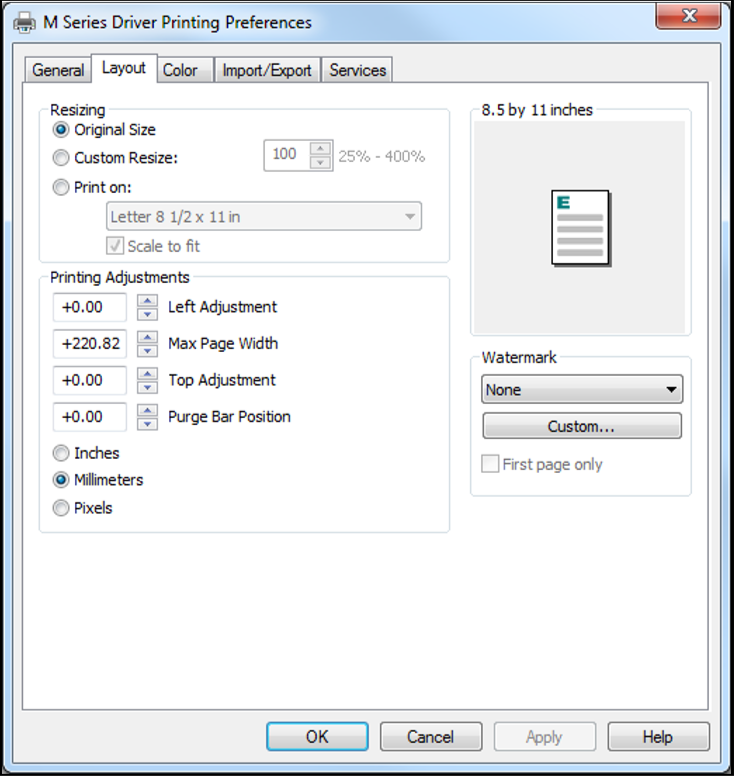
Layout Tab
Layout allows you change how the document prints without changing the original document.
Resizing
-
Original Size - no changes
-
Custom Resize - lets you resize the original as a % of normal size. The printer will print the document in the size you selected regardless of the size of the paper selected.
-
Print on - Lets you specify the particular size of paper that you want to print on regardless of the size of the original document. Checking “Scale to Fit” automatically resizes the document to fit on the new page size.
|
|
|
Printing Adjustments – Allows you to make minor changes to the print position and print area; in relationship to the media feed direction.
NOTE: The values entered, in the following adjustments, do NOT override the values set in the Toolbox (User Interface and Service Menus - Printer Control Config). Instead, values are cumulative. The range values (min and max), provided below, assume that the Toolbox values for “tof_adjustment” and “left_adjustment” are set to zero (0) and the Purge Bar Position in the Toolbox, User Interface screen, is set to zero (0). Exceeding these min or max values may cause the printer to print nothing (feed the media blank).
-
Left Adjustment – Lets you shift the printed image left or right.
- Range: -2.98mm left to +200.02mm right. Default = Zero (0)
- negative value = shift right (towards operator side)
- positive value = shift left (towards non-operator side)
- Zero (0) = left edge of media; if Media Registration Side Guide is set to “inner position”.
-
Max Page Width – Lets you limit how wide the actual print area will be. This feature can be used to “cut-off” the right-side (operator side) of an image; at a set position.
- Range: +0.5mm to +220.82mm. Default = 220.82 (full print width)
-
Top Adjustment - moves the image up or down on the media.
- Range: -4.95mm up to + 200.02mm down. Default = Zero (0)
- negative value = shift up (towards leading edge)
- positive value = shift down (towards trailing edge)
- Zero (0) = leading edge of media.
-
Purge Bar Position*– This feature allows you to adjust the purge bar location; to account for the extra length needed to reach the actual gap between pieces.
- Range: -53.75mm up to +200.02mm down. Default = 0
- negative value = shift up (purge sooner)
- positive value = shift down (purge later)
- During normal operation, the printhead spits a small amount of ink into the gap between pieces; to keep the nozzles clear and hydrated. For irregular-shaped pieces (like an open envelope flap), the Paperpath Entry sensor may see the trailing edge too soon; causing the printer to purge (spray a line of ink) onto the flap.
-
Tip: Optimally, this value should be set so the purge bar is positioned about 3 mm past the trailing edge of the media.
-
NOTE: The value set should not exceed the physical gap that the “Paperpath Entry Sensor” sees between pieces; minus at least 5 mm. Setting this value too large may cause blank (unprinted) pieces to be fed, purge bar printing on leading edge of next piece, and or “false” “PAPERPATH_FEED_TIMEOUT” conditions (with media stopping inside the print engine).
- * See also “Purge Bar Position” in the “Toolbox Features” section. Values are cumulative.
-
Units Selection– Printing Adjustment values can now be displayed in Inches, Millimeters or Pixels. Select between: Inches, Millimeters, or Pixels
-
NOTE: Values will automatically be converted when unit selection is switched. However you may find that the converted values are rounded up or rounded down.
|
Watermark– Prints background text onto the media along with the original image. A few selections (SAMPLE, Draft, COPY, and Confidential) are provided.
-
First page only – When a watermark is selected; the “First page only” option is available. Selecting this option prints the watermark on the first page, but not subsequent pages. Un-checking this option prints the watermark on all pages.
-
Custom – This button lets you create a new watermark or edit an existing watermark, including font selection, color, size and printing angle.
|
Color Tab
The
Color Tab features allow the operator to make global color adjustments to the output of the printer.
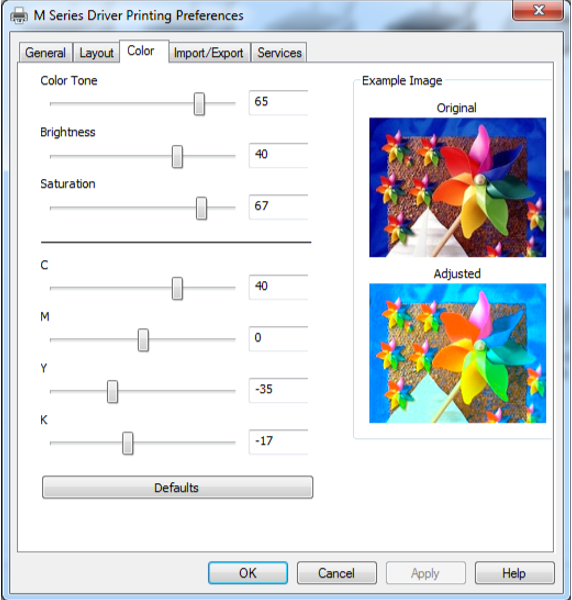
The following controls (sliders) are available:
- Color Tone
- Brightness
- Saturation
- C (Cyan)
- M (Magenta)
- Y (Yellow)
- K (Black)
Use the “Defaults” button to reset all selections back to zero.
NOTE: Example Image “Original” and “Adjusted” views are provided for demonstration only. They will not reflect the actual printed output. Some experimentation (changing settings and performing test prints) will be needed to obtain the desired printed output. The adjustments made do not make any changes to the original artwork/file, but the driver settings can be saved using “My Printer Settings”, located under the General tab.
Import/Export Tab
Import/Export is used to preserve any custom Media Sizes, Watermarks and Print Settings, you may have added/created for various jobs.
|
Watermarks – select to export/import |
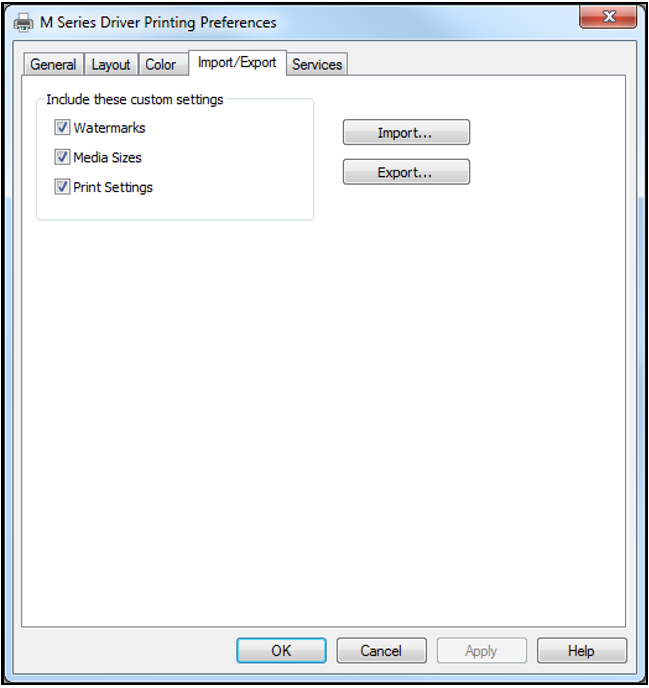
|
|
Media Sizes – select to export/import |
|
Print Settings – select to export/import |
|
Export – Use to save your selected, custom settings to a “holding file (*.ini) before uninstalling/re-installing/updating the M Series Driver. |
|
Import – Used to import your selected, custom settings, from a previously saved “holding file” (*.ini), after the M Series Driver is re-installed or updated. |
|
IMPORTANT!- BEFORE REMOVING, REPLACING or UPDATING THE M SERIES DRIVER; USE THIS FEATURE TO EXPORT ANY CUSTOM SETTINGS YOU HAVE ADDED/CREATED. |
Services Tab
NOTE: The security rights/settings, on some computer systems, may prevent you from accessing the features on the “Services Tab”. These features can also be accessed via the Toolbox utility.
The Services Tab features allow you to:
Print Configuration Page – Prints out the current printer configuration including firmware version, supplies status/serial numbers. Also displays NVM and VARS settings.
|
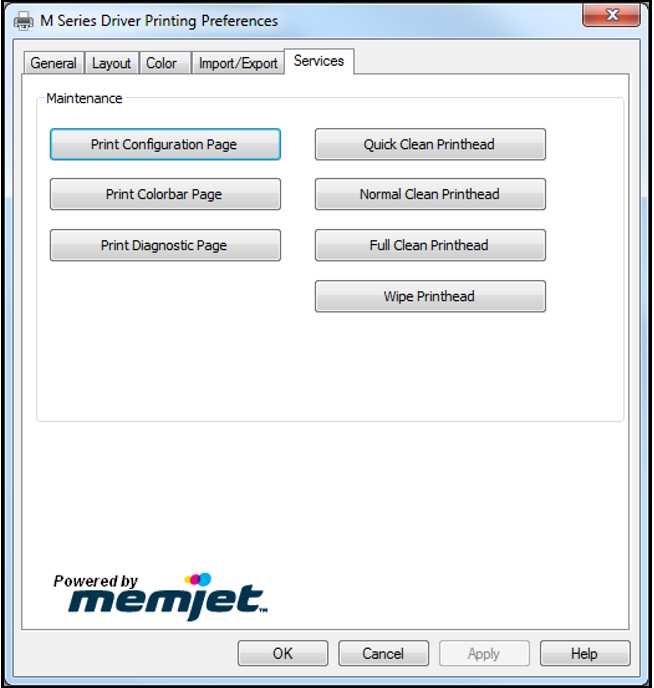
|
Print Colorbar Page – Prints seven solid blocks/bars of color to show how well the Printhead is mixing colors and printing.
|
Print Diagnostic Page – Prints out printer information such as Device serial number, Firmware version, Internal memory, page counts, Network Settings and Even Log.
|
Quick Clean Printhead – Circulates ink, purges nozzles, wipes and cleans the surface of the printhead nozzles.
|
Normal Clean Printhead – Provides a higher level of nozzle cleaning than “Quick Clean”.
|
Full Clean Printhead – Provides a higher level of nozzle cleaning than “Normal Clean”.
|
Wipe Printhead – Wipes excess ink from the surface of the printhead nozzles. No ink is ejected in this process.
|
NOTE: Load 8.5 x 11, or longer, media before performing the above printouts. Wait for the job or test print to finish before pressing any additional buttons.
